
MQ‑2 Gas & Smoke Sensor — Complete Technical & Application Guide
- Type
- MOS (SnO₂) Sensor
- Target Gases
- LPG · Smoke · Alcohol · H₂ · CH₄ · CO
- Detection Range
- 200–10,000 ppm
- Output
- Analog (A0) + Digital (D0)
- Operating Voltage
- 5V DC
Typical Sensitivity Characteristics
Sensing-resistance ratio (Rs/Ro) vs. gas concentration — the curve every MQ-2 calibration decision starts from. Hover a gas name to isolate its line.
Schematic / representative curve based on commonly published MQ-2 characteristics (e.g. Winsen-style datasheets) — not measured data from a specific batch. Always calibrate against your own module before treating readings as quantitative.
Contents
What Is the MQ-2 Gas Sensor?
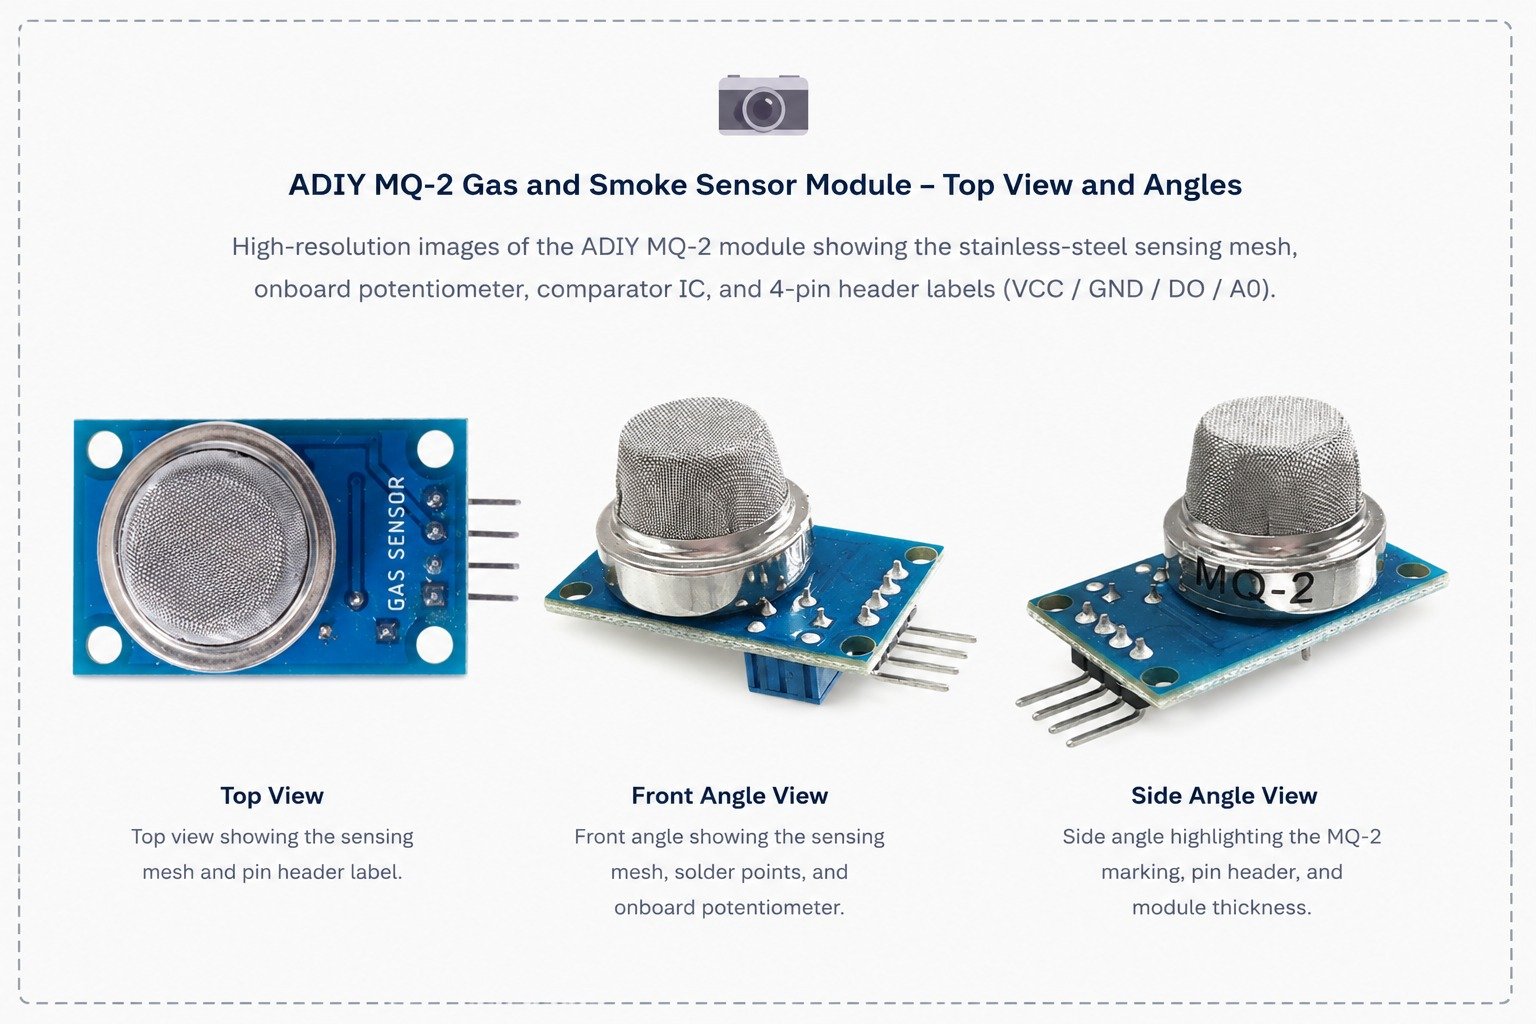
The MQ-2 is a low-cost metal-oxide semiconductor (MOS) gas sensor built to detect a broad range of combustible gases and smoke — LPG, propane, butane, methane, hydrogen, alcohol vapor, and carbon monoxide all register on it to varying degrees. It's sold as a small breakout module: a sensing element in a stainless-steel mesh housing, mounted on a PCB with an onboard comparator, a sensitivity potentiometer, and both analog and digital outputs.
That combination — cheap, broad-spectrum, and breadboard-ready — is exactly why it's become the default gas sensor for student projects, hobbyist safety devices, and early-stage IoT prototypes across India. It's the sensor behind a huge share of "gas leak detector," "smart kitchen," and "fire alarm" mini-projects built every year.
How the MQ-2 Actually Works
Inside the sensor's metal mesh sits a small ceramic element coated in tin dioxide (SnO₂), heated by an internal coil to a stable operating temperature. In clean air, oxygen molecules adsorb onto the SnO₂ surface and trap free electrons, leaving the material in a relatively high-resistance state.
When combustible gas molecules reach the surface, they react with that adsorbed oxygen and release the trapped electrons back into the material — its electrical resistance drops. The more gas present, the larger the drop. This is a chemiresistive sensor: it doesn't "count" gas molecules directly, it measures a resistance change caused by a surface chemical reaction, and converts that into a voltage the module can output.
Rs and Ro — the two numbers that matter
Two values define how the sensor behaves:
- Ro — the sensor's baseline resistance in clean, gas-free air.
- Rs — the sensor's resistance under whatever air it's currently sensing.
The ratio Rs/Ro is what the sensitivity curve above actually plots. It falls as gas concentration rises — which is why every calibration procedure for this sensor starts with establishing Ro in known-clean air before anything else.
Analog vs. digital output
The module exposes both:
- A0 (analog): a voltage proportional to Rs — useful if you want to read a continuous trend or estimate concentration.
- D0 (digital): a clean HIGH/LOW signal, tripped once the analog level crosses a threshold set by the onboard potentiometer — the simplest option for a straightforward alarm.
Electrical & Performance Specifications
| Parameter | Typical Value | Notes |
|---|---|---|
| Sensor type | MOS / SnO₂ | Chemiresistive |
| Operating (circuit) voltage | 5V DC ± 0.1V | Both heater and signal circuit |
| Heater power consumption | ≤ 800 mW | Roughly 150–160 mA at 5V |
| Detection range | 200 – 10,000 ppm | Combustible gases & smoke |
| Load resistance (RL) | Adjustable | Set via onboard potentiometer |
| Preheat / burn-in | 24–48 hrs (one-time) | For fully stable calibration |
| Power-on warm-up (routine use) | 20–60 sec | Minimum before trusting a reading |
| Response time | < 10 sec | To reach 63% of final value |
| Recovery time | < 30 sec | Back to baseline after exposure |
| Operating temperature | -20°C to 50°C | Accuracy degrades near extremes |
| Operating humidity | ≤ 95% RH | Non-condensing |
Pinout & Wiring with Arduino
| Pin | Function | Connects to (Arduino Uno) |
|---|---|---|
| VCC | 5V supply (heater + circuit) | 5V |
| GND | Ground | GND |
| D0 | Digital threshold output | Any digital pin (e.g. D2) |
| A0 | Analog concentration output | Any analog pin (e.g. A0) |
Hardware Setup — Step by Step
- Mount the MQ-2 module on a breadboard away from direct airflow (fans, open windows) so readings aren't skewed by ambient air movement.
- Wire VCC and GND first, then D0 and/or A0 depending on which output you plan to use.
- Power the board and let the sensor warm up — minimum 20–60 seconds for casual testing; leave it powered for 24–48 hours once, unattended, if you intend to calibrate it properly (see §7).
- If using D0, adjust the onboard potentiometer while monitoring the LED/output — turn until the threshold trips at the sensitivity you want.
- If adding a buzzer or relay as an alarm output, wire it to a separate digital pin and test it independently before integrating with the sensor logic.
Arduino Code: Two Approaches
Pick the approach that matches what your project actually needs — a simple alarm doesn't need concentration math, but a data-logging or dashboard project does.
Approach A — Digital threshold (simplest, recommended for alarms)
// MQ-2 digital-threshold alarm
// Trips a buzzer when gas concentration exceeds the
// threshold set by the onboard potentiometer

const int mq2DigitalPin = 2;
const int buzzerPin = 8;

void setup() {
  pinMode(mq2DigitalPin, INPUT);
  pinMode(buzzerPin, OUTPUT);
  Serial.begin(9600);

  Serial.println("Warming up MQ-2...");
  delay(30000); // minimum warm-up before trusting a reading
  Serial.println("Ready. Monitoring for gas.");
}

void loop() {
  int gasDetected = digitalRead(mq2DigitalPin);

  if (gasDetected == HIGH) {
    Serial.println("WARNING: Gas threshold exceeded");
    digitalWrite(buzzerPin, HIGH);
  } else {
    digitalWrite(buzzerPin, LOW);
  }
  delay(500);
}
Approach B — Analog reading with an approximate ppm estimate
This approach gives you a usable number for logging or a display, but it is an approximation, not a lab-grade measurement — see the calibration section for why.
// MQ-2 analog reading with a simplified concentration
// estimate. Replace RO_CLEAN_AIR with your own calibrated
// value — see §7 before trusting the ppm output.

const int mq2AnalogPin = A0;
float RO_CLEAN_AIR = 10.0; // kΩ — placeholder, calibrate this

void setup() {
  Serial.begin(9600);
  Serial.println("Warming up MQ-2...");
  delay(30000);
}

void loop() {
  int raw = analogRead(mq2AnalogPin);
  float voltage = raw * (5.0 / 1023.0);
  float rs = (5.0 - voltage) / voltage; // simplified Rs estimate
  float ratio = rs / RO_CLEAN_AIR;       // Rs/Ro

  Serial.print("Raw ADC: "); Serial.print(raw);
  Serial.print(" | Rs/Ro: "); Serial.println(ratio, 2);

  // Compare `ratio` against your gas-specific curve
  // (see §7) to convert this into an actual ppm value.
  delay(1000);
}Calibration & Best Practices
1. Establish Ro in clean air
Power the sensor in open, gas-free air (outdoors or a well-ventilated room) for the full burn-in period, then record its stable resistance value. That's your Ro baseline — every subsequent Rs/Ro calculation depends on it being accurate.
2. Compensate for temperature and humidity
MOS sensors like the MQ-2 drift with ambient temperature and humidity. For casual projects this is usually acceptable noise; for anything safety-relevant, log ambient conditions alongside your readings and expect wider tolerances in extreme heat, cold, or humidity.
3. Mind sensor placement
Mount away from direct airflow, cooking steam, or condensing moisture, and at a height appropriate to the gas you're targeting — LPG is heavier than air and pools low, while methane and hydrogen rise, so "near the ceiling" and "near the floor" are not interchangeable placements depending on what you're detecting.
4. Expect sensor drift and plan replacement
The sensing element ages with use; expect gradual drift over a service life on the order of a few years of regular operation. Re-check calibration periodically against a known gas source, and replace the sensor if the baseline shifts significantly.
Real-World Applications
The MQ-2's broad gas coverage makes it a starting point for a wide range of projects — a handful of the most common:
Kitchen LPG leak detection
Early-warning alarm for cylinder or pipeline leaks in a home or hostel kitchen.
Smoke & fire alarms
Standalone or networked smoke detection alongside temperature sensing.
Industrial gas monitoring
Low-cost supplementary monitoring in workshops and small manufacturing units — alongside, not instead of, certified detectors.
Biogas & air-quality logging
Tracking methane output from a home biogas plant, or general indoor air-quality trends.
Alcohol-detection projects
Breathalyzer-style demos and vehicle-ignition-interlock class projects (educational scope only).
Smart-home safety hub
One node in a broader home-automation build — gas alarm feeding into a central controller alongside motion and door sensors.
Limitations & Safety Considerations
- Cross-sensitivity: the MQ-2 can't reliably distinguish between gas types on its own — a reading could mean LPG, smoke, alcohol vapor, or several of them at once.
- Drift and aging: sensitivity shifts over the sensor's life; periodic re-calibration is necessary for consistent results.
- Environmental sensitivity: humidity and temperature swings affect readings, particularly analog concentration estimates.
- Response/recovery lag: a few seconds of delay exist in both directions — not instantaneous.
- Uncalibrated ppm is a guess: without establishing Ro and applying the gas-specific curve, "ppm" numbers from the analog output are directional, not quantitative.
Everything on this page, in stock
MQ-2 modules, the rest of the MQ-series, and Arduino-compatible boards to build on — all Make-in-India, all pin-compatible.
MQ-2 vs. the Rest of the MQ-Series
The MQ-2 is the generalist. If your project is aimed at one specific gas, a more targeted sensor in the same family may perform better.
| Sensor | Best For | Range | ADIY Product |
|---|---|---|---|
| MQ-2 | General combustible gas + smoke (LPG, alcohol, H₂, CH₄, CO) | 200–10,000 ppm | View |
| MQ-3 | Alcohol vapor | Varies by app | View |
| MQ-4 | Methane / CNG | Varies by app | View |
| MQ-5 | LPG / natural gas — more targeted than MQ-2 | 200–10,000 ppm | View |
| MQ-6 | LPG (propane/butane specific) | 200–10,000 ppm | View |
| MQ-7 | Carbon monoxide | Varies by app | View |
| MQ-8 | Hydrogen | 100–10,000 ppm | View |
| MQ-9 | LPG, CO, CH₄ combined | Varies by app | View |
| MQ-135 | General air quality (NH₃, NOx, CO₂, benzene, smoke) | Varies by app | View |
Rule of thumb: MQ-2 for a general or multi-gas/smoke project, MQ-5 or MQ-6 for a project specifically about LPG, MQ-7 for CO specifically, MQ-135 for general indoor air quality.
Frequently Asked Questions
What gases can the MQ-2 sensor detect?
The MQ-2 responds to LPG, propane, butane, methane, hydrogen, alcohol vapor, smoke, and carbon monoxide. It's a broad-spectrum combustible-gas sensor, not a gas-specific one — see §2 for what that means in practice.
Is the MQ-2 accurate enough for a certified LPG leak detector?
No. The MQ-2 is a hobbyist/educational sensor, useful for learning projects and early-warning prototypes, but it is not a certified life-safety device. Commercial or industrial gas-safety installations should use a calibrated, certified detector.
How long does the MQ-2 sensor need to warm up before use?
At least 20–60 seconds of power-on time before trusting a reading in casual use. For calibrated, repeatable measurements, most MQ-series datasheets recommend a one-time burn-in period of 24–48 hours before readings fully stabilize.
What's the difference between the MQ-2 and MQ-5 sensors?
The MQ-2 is a general combustible-gas/smoke sensor covering LPG, smoke, alcohol, hydrogen, and methane. The MQ-5 is tuned more specifically for LPG and natural gas. For a project that's specifically an LPG leak detector, MQ-5 or MQ-6 is a slightly more targeted choice; MQ-2 is the better all-rounder for a mixed-gas or smoke-plus-gas project.
Can I get an exact ppm reading from the MQ-2's analog output?
Only approximately, and only after proper calibration. The analog output tracks concentration, but converting it to accurate ppm requires establishing your sensor's baseline resistance in clean air (Ro) and applying the sensitivity curve for the specific gas you're measuring. Without calibration, treat it as a relative trend, not an absolute measurement.
How long does an MQ-2 sensor last before it needs replacing?
Metal-oxide sensors like the MQ-2 drift as the sensing element ages, typically over a service life on the order of a few years of regular use. For safety-relevant projects, periodically re-check calibration against a known gas source and replace the sensor if readings drift significantly.